British Tank Markings - Overview
British tank and vehicle markings during the Second World War are a very interesting but rather complex subject.
What follows is a brief overview of the system, and an explanation of the symbols and markings used throughout the diagrams on this site.
Formation Badges
Perhaps the most varied marking found on British and Commonwealth tanks and vehicles was the formation badge. These signified the formation to which a particular vehicle belonged, from Brigade level upwards, and were displayed both front and rear on most vehicles. Officially these markings were to be 9" square on the vehicle's bumper or wing panel, but the size and location varied depending on the type of vehicle and the space available.
A few examples of the most well known formation badges are shown below:
Arm of Service Flashes
Arm of Service flashes were coloured squares containing a numerical code. The colour indicated the branch of service of the unit - Royal Engineers, Royal Artillery, etc - and the number indicated the position of a particular unit within the formation. These numbers changed several times throughout the war, as can be seen in the diagrams across this site.
Arm of Service flashes were also displayed front and rear on most vehicles, usually on the opposite side to the formation badge, although some units combined the formation badge and AoS flash into a single marking. Like the formation badge, these markings were officially supposed to be 9" square, but the size varied depending on the type of vehicle and the space available.
An overview of the arm of service colours is shown below:
Numbers were usually white, but in the case of flashes with white or partially white backgrounds, they were red.
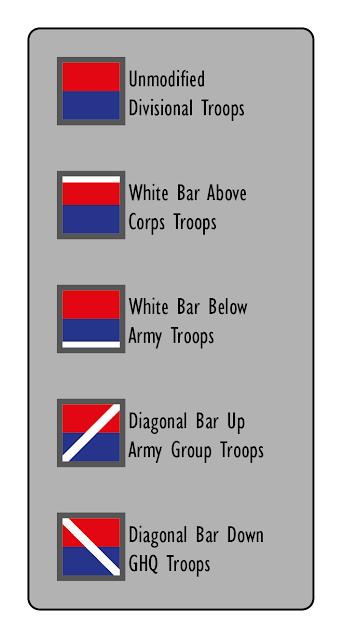
Arm of Service flashes were also subject to modifiers to indicate units belonging to higher-level formations, as shown below:
The diagonal bars for Army Group and GHQ troops would generally be "broken" above and below the numbers. Signals units used red bars rather than white.
Tactical Signs
Most commonly seen on tanks and armoured cars, tactical signs were used to identify the vehicle within its regiment and the regiment within its brigade.
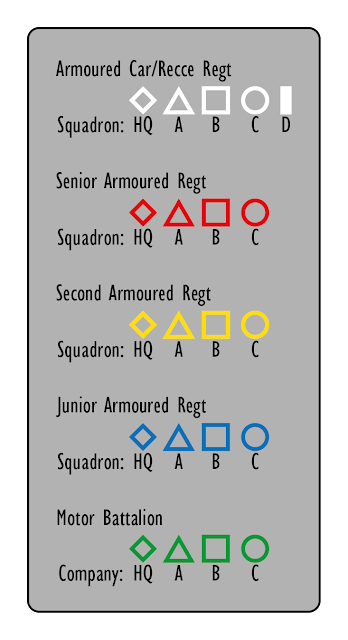
Armoured brigades generally comprised three armoured regiments, considered Senior, Second and Junior. The colour of the tac sign denoted the regiment's position in the brigade.
Within a regiment, different shapes were used in outline to identify the squadrons - a diamond for the regimental HQ, a triangle for A squadron, a square for B squadron, and a circle for C squadron. In cases where a D squadron existed, it was given a solid vertical rectangle.
The position, orientation, style and size of these markings varied between units, but generally would appear on either side of the turret or hull. Armoured Car and Armoured Recce regiments tended to display them on the front and rear of the hull, while Churchill tank units often displayed them on the turret rear.
Some units would take the tac signs a step further, and add a number to identify the troop to which a tank belonged, or individual tanks within the squadron. The numbers within the tac sign could be of the same colour, or white. Some units also painted the inside of the tac sign black, or inverted the triangular markings to face downward.
Bridge Classification Markings
British Army vehicles were given bridge ratings based on several factors including their overall weight, wheelbase and axle load. Vehicles displayed their bridge rating either on a detachable circular yellow plate, or on a yellow circle painted directly onto the hull, on the front of the vehicle only.
It was usually a solid yellow circle with black numerals, but could also be rendered as a yellow outline with yellow, white, or black numerals.
Vehicles usually paired with a trailer displayed two numbers - the upper number for the combined weight of tractor and trailer, and the lower number for the tractor itself.
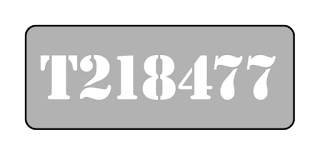
War Department Numbers
- A - Ambulance
- C - Motorcycle
- D - Dragon
- E - Engineer vehicle (bulldozer etc.)
- F - Armoured car
- H - Artillery tractor (wheeled)
- L - Lorry (over 15cwt)
- M - Motor Car, Light Recce Car
- P - Amphibious vehicle
- S - Self-propelled gun
- R - Rotatank
- REC - Recovery vehicle
- T - Tracked vehicle (tanks etc)
- V - Van
- X - Trailer
- Z - Truck/Halftrack (up to 15cwt)
Vehicle Names
Vehicles, particularly tanks, were often given names by their crews. Usual practice was for the names to begin with the squadron letter. A squadron tanks would have names starting with A, B squadron with B, etc.
These names were often applied by the crews themselves and so appeared in various colours, sizes and positions.
Recognition Markings
Unlike the German Army, who consistently used the Balkenkreuz throughout the war as a national recognition symbol, the British Army entered the war with no official recognition markings, and used several different markings as the war progressed.
Units sent to France as part of the British Expeditionary Force carried a simple white square on the hull front, rear and sides. This was later supplanted by a revival of the First World War Royal Armoured Corps flash, and later in the Western Desert by a version with the colours reversed. These became known as "Crusader Stripes" due to their prevalence in Operation Crusader. Again, these appeared on the hull front and sides, and occasionally on the turret.
Some vehicles carried an RAF-style roundel on their upper surfaces to aid recognition from the air, particularly in North Africa. On tanks it was generally painted on the rear engine deck, while on trucks and other soft-skin vehicles it would appear on the bonnet.
In early 1944 the Allied Star was adopted and, officially at least, supplanted all other recognition markings. The plain star was generally used for the sides of vehicles, while the circled star was used on upper surfaces as an aerial recognition marking.
Royal Artillery Markings
Royal Artillery vehicles carried additional markings to further identify vehicles as belonging to particular batteries or troops. Similar in appearance to Arm of Service markings, but smaller, these were carried on towed guns, self-propelled guns, gun tractors, and other vehicles.
The pattern of the marking denoted the battery to which a vehicle belonged, with one quarter being coloured, starting with the upper-right for the first battery and rotating clockwise for subsequent batteries. Field, Medium, Heavy, AT and AA regiments all used a red corner, while Survey regiments used yellow, and added a yellow flash to the HQ marking.
The system was augmented with various numeral or letter codes to further identify the role of a particular vehicle within the battery.
A quick overview of the battery markings is shown below, but the system will eventually be described in greater detail on its own page.
Sources:
- Taylor, D (2011) Warpaint: Colours and Markings of British Army Vehicles 1903-2003 - Vol. 3
- Taylor, D (2009) Warpaint: Colours and Markings of British Army Vehicles 1903-2003 - Vol. 2
- Taylor, D (2008) Warpaint: Colours and Markings of British Army Vehicles 1903-2003 - Vol. 1
- Bellis, M (1992) 21st Army Group Organisaton & Markings
- Zaloga, S (1990) Blitzkrieg Armour Camouflage and Markings 1939-1940
- White, B T (1978) British Tank Markings and Names
- Jones, K (1977) Focus on Armour Camouflage and Markings No.2 British North Africa
- Wise, T (1979) D-Day to Berlin - Armour Camouflage and Markings of the United States, British and German Armies, June 1944 to May 1945
- Wise, T (1973) Military Vehicle Markings - Part 2
- Wise, T (1971) Military Vehicle Markings
- Bradford, G (1971) Armour Camouflage and Markings North Africa 1940-1943
- Hodges, P (1971) British Military Markings 1939-45
- "British Tank Markings in Normandy" - FlamesofWar.com


Fantastic source of information. Thanks very much for your hard work!
ReplyDeleteI've never thought about this in such detail before, very interesting!
ReplyDeleteGood effort. A lot of hard work and research has gone into this.
ReplyDeleteGood to see a colour resource available like this. Most books on the subject are quite old and difficult to get hold of - and a lot of diagrams have to be interpreted from monochrome drawings. I appreciate this is an overview but I'd like to suggest one amendment. What you describe as 'Crusader Stripes' white/red/white were introduced specifically for Operation Crusader in the Western Desert in November 1941 and persisted on tanks which took part in this campaign for a while after that, until they were lost of repainted. It is rare to see them after the Spring of 1942. The RAC flash (red/white/red) was introduced late in 1942 and, though similar, was unrelated to the Crusader type. It was meant to be worn by all armoured vehicles and can be seen in the UK, Tunisia (by 1st Army, not 8th), and then on most A vehicles in Sicily and Italy. Though its use was in decline by 1944, there were still a few support units that displayed it in Normandy and it remained on vehicles in Italy.
ReplyDeletewhat are the markings for the Commonwealth units?
ReplyDelete